Second tutorial for Smash Book

First, sorry to tell you,
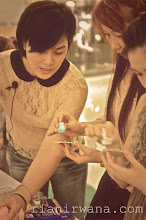
the above pic is not the result page
of today's tutorial for Smash Book.
*grin*
It's not always convenient for me to
take pictures after pictures using iPhone
during my time doing art.
Especially the one like the above,
when all the mediums required two messy hands,
one subconscious mind working,
and sometimes, also a superhero's full speed,
before the effect dried.
So.
I am talking about the pages behind this one.
Which is this :

Ugly, I know.
And I assume many of you
are afraid to use heavy medium on Smash Book
because you don't want to get this kind of
ugly pages afterwards.
*come on, show me your grin*
While I myself don't mind,
this pages kept me clueless for weeks.
Added some bookmark and label and
even tried to sparkle it with
Tide Pool- Glimmer glitter paint,
aaaand, still no good.
Until yesterday,
I finally decided to cover the ink spread
with papers.
But love the words there,
So I put the papers after the words.

And to the other page,

For you who had seen my Smash Book in real world,
you know I don't fancy clean edges
or evenly page sizes.
Whenever I had the chance to vary the edges,
like this one,
I will jump happily to it.

And the page behind it was happy too.

Continue on the layering,

Alter some when necessary,

I was getting excited at this point,
and felt this one will be a good page.
Digging my stash for some strong image.
I still need to cover more ink spread.
Found it!

Slip a layer again before the image.
Love it.

Moving to the other page,
I found this card and color very soothing.
And the rose match!
Aaaaa....

Don't forget to zoom out every once in awhile,
checking the composition for two spread pages
is important.

Zoom in again.
I found this corner bothering.
Drastic change, not nice.

But I don't want to cover up the roses here,
so the solution is something transparent.
Hmmm...
Washi tapes, anyone?
Hahahahaha....

One stripe was not enough,
I added one more.

Oh, well, maybe one more stripe.
Three is a good number, eh?

Altered it again,

Use two tones of distress ink.
Spray it with water.

Heating tool must be in reach.

While thinking on what to write,
I tested several pens and markers.
For the size, the color tones,
and if it's still good after long time storing.

There.
The Faber Castel PITT artist pen
was the winner this time.

Outlined them with Uniball Signo 1.0.

Do not make it a perfect outlines.
Perfect is boring.

Me in love with small envelopes recently.
This space will be good for one.
Nyam. Nyam. NYam.

More thoughts.
Just make it smaller than the previous one,
so the two pages will not compete
with each other.

Time to zoom out again.

I love how the first mission, which is,
to cover the ink spread was successfully done.
Now,
could you see that
the upper sections still need something?
Something to connect the two pages.
I picked up this mask.

And the absolutely stunning effect from
Stampendous embossing enamel.
You have to stock up all the colors, I told you.
All gorgeous!


The corner still need something,
so I added this tag.
Brads should be within reach too.

Last,
one more round for altering,


There.
I am very happy with the result.

Hoping this simple tutorial
will encourage you more to try many mediums.
Embrace the spill, spread, and squirt
that will appear anywhere in the book,
which will lead you to more adventure
in exploring your Smash Book.
Again,
Perfect is boring.
So don't even try.


keren banget!! dan gambar lady nya itu cantik bngt! ditunggu tutorial berikutnya.. btw ini brapa jam bikinnya? haha..
Posted by yuni |
June 11, 2012 at 8:48 AM
yuni |
June 11, 2012 at 8:48 AM
mengesankan!!!!
Perfect is boring.
So don't even try.
okesip~
Posted by ina |
June 11, 2012 at 9:07 AM
ina |
June 11, 2012 at 9:07 AM
Hi ci, kerenn habiss....thanks for sharing.
Posted by Suriana Ju |
June 11, 2012 at 9:11 AM
Suriana Ju |
June 11, 2012 at 9:11 AM
Sukaaaa banget... Smash ku msh kosong hehehe....
Posted by joVita m. |
June 13, 2012 at 4:35 AM
joVita m. |
June 13, 2012 at 4:35 AM
Jadi pengen bikin juga deh..... :D
Posted by xty by Christyviera Supriyadi |
June 17, 2012 at 12:35 AM
xty by Christyviera Supriyadi |
June 17, 2012 at 12:35 AM
Riiiaaaa!! This is sooo gorgeous! Love the tutorial too! Eeks!
Posted by Lia |
June 24, 2012 at 8:27 PM
Lia |
June 24, 2012 at 8:27 PM
That's a great tutorial and a lovely page. Thanks for posting it.
Posted by Linda |
June 25, 2012 at 6:47 PM
Linda |
June 25, 2012 at 6:47 PM
I always love to see what's in your smash book!!! So inspiring!
Posted by Unknown |
July 1, 2012 at 2:39 AM
Unknown |
July 1, 2012 at 2:39 AM