« Home | Good reading - Martha Stewart Living, Indonesia » | Goela Merah - food market » | One thing that scares me in : OCTOBER » | Spread your wings and fly » | Sweet Serendipity » | Be kind » | Everything has its purpose » | PASAR SENI ITB 10.10.10 » | 0fficial posters of PASAR SENI ITB 2010 » | What a loco days. »

Glimmer Mist - on chipboard embellishments


You may remember these chipboard embellishments
as one type from many that I sold on fb
few weeks ago, or you may saw it at my store
at Citos or Senci, Jakarta or IP, Bandung.
(Hopefully you already grabbed some.:))

I just have the chance now
to show you how to color these chipboards, 
beside using acrylic paints that I used to
show you in my classes.
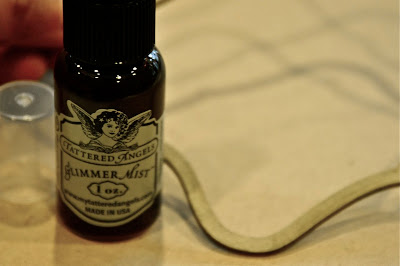
This method using Glimmer Mist from Tattered Angels
is much simpler and quicker for sure.

Are you ready?

First,
You can take one of frame chipboard here


And trace the shape to the patterned paper
you will use later, cut it a few mm smaller
than the chipboard shape.


Of course,
The photo size you choose must be fit nicely
into the frame chipboard.


Now, Bring it on, baby....
bring the glimmer mist on....


I like to use some cardstock as background
while I am spraying, cause the mist
will go everywhere...
and I intend to NOT waste any of it.LOL.
I'll use the cardstock later for, well,
anything.
So all you have to do is tap the bottle
slowly in the bottom, to your palm.
(not shaking the bottle, cause it will cause the
glimmer powder to go straight up and choke
the spray, which will make you to do extra work 
with washing the spray head with warm water
to clean it up again, or spray it with 'tornado'
-a gear to clean up camera lens-)

After the powder blended with water, spray it.


See the glimmering color there?
If at first you spray it you only see
the water, not the glimmer,
don't fred, just spray some more.
From the pic above, you may think that 
the color doesn't change much.
But see it when I put the frame back
to the other size of raw chipboard frames
I took from earlier.


Nice, right?
And with the less amount of drying time,
you can glue it to your page immediately
and finish your layout in no time.


After you trying these very basic skill
for using glimmer mist,
I'll add on more tips and skill using it
in my next class.


note : The photo of the dress is belong
to Mrs.Vina Vinessa who designed it.
I was asked to make her portfolio
with scrapbook style,
which I gladly make this last two weeks.

Thanks for the tutorial, Ria. I'm still learning it, too. Sometimes the glimmer doesn't come out. I'll try more and more until I know the best trick to use the glimmer mist.

Ri, thanks for the tips, it's TOP! =D

Post a Comment

About me

  • I am a woman who fell in love with papers and words long enough before with boys. Therefore, scrapbooking, writing, reading, and art journaling are just things that complete me. I live happily in Bandung, Indonesia, with my husband, Audy Kusnadjaja, and 2 adorable kids adore me. Isn't life sweet?
My profile

About this home

Be careful while going inside my home here. Your clothes may gets stain if you happen to walk by my still wet canvas, or stumbled upon our piles of books everywhere, and come out with a scrap paper sticking to your shoes. But I promise you, you'll enjoy the time spending here. Tea or coffee?
  • The beginning
  • Last preparation
  • Artsy Girl's scrapper bag
  • Artsy Girl's mini album
  • Back to school
  • You rock!
  • Doilies for memories
  • Becoming an artist
  • Scrap my heart away
  • Too much of good things
  • Yellow sometimes
  • Double pages
  • Some layouts
  • Don't reinvent the wheel
  • Tips for dividing scrap time
  • Back to school album
  • Christmas album 2009
  • A month to play, a month to learn
  • 'Life happens' album
  • My girl's b'day album
  • Recycling the baby book
  • My boy's b'day album
  • About stranger
  • Make something every day
  • 2009 Art journals - bounded
  • Art journals - begin
  • 2009 Daily Journal
  • 2008 Daily Journal
  • Cracked
  • Parade
  • Hierarchy
  • Fleeting
  • Legendary
  • Time
  • Voices
  • Balloon
  • Wise
  • Repair
  • String
  • First painting
  • Life of two girls-treasure box
  • Box of memories
  • Making your own embellishment
  • A month to play and learn
  • Art journal album cover
  • Week in The Life - 2011
  • Week in The Life - 2010
  • Week in The Life - 2009
  • Week in The Life - 2008
  • To see the album - click here
  • To see the class - click here
  • To see the album - click here
  • To see the class - click here
  • To see the album - click here
  • To see the class - click here
  • To see the layouts - click here
  • To see the class - click here
  • To see the album - click here
  • To see the class-group 1 - click here
  • To see the class-group 2 - click here
  • To see the album - click here
  • To see the class - click here
  • To see the album - click here
  • To see the Jkt's class - click here
  • To see the Bdg's class - click here

  • The story - click here

  • The story - click here

  • See inside - click here

  • See inside - click here
  • See inside - click here
  • See inside - click here
  • See inside - click here
  • Other article - click here
  • My Artist Papers

  • Wings in The Cage - series
  • Where is it ? - click here
  • New place - click here
  • Eat&Eat Kelapa Gading
  • Eat&Eat - part 2
  • Kartika Sari-kebon jukut
  • Warung Talaga-PVJ
  • Sagoo restaurant Bogor
  • Eat&Eat 2 - Gandaria City
  • Goela Merah - foodcourt
  • Ba-koel - foodcourt
  • MariSini - food stall
  • Eat&Eat 3 - Surabaya
  • Warung Talaga Ciwalk - new place
  • Wajan restaurant
  • Warung Talaga - Serpong
  • Eat&Eat 4 - Serpong
  • Lekker Bekker
  • Previous posts