November 30, 2010

Artsy Girl - mini album


When I saw this series of Lost & Found papers
my heart dropped instantly and moan.
Please, please, please,
I have to have these papers!
All I want is 
to make a beautiful album with it.
Then more to my first expectation,
I can get enough supplies of these papers
to make the album in a workshop!
Superb.


When the album was done,
the next best thing is to fill it with
our precious things, right?
And I found these thought
to be the most important one.

So I printed lots of my favorite sayings
I got from Brave Girl by amazing Melody Ross
(and for all the kits at the workshop)
and put it here,
for me, and for my daughter.


 All I wish for her is
 she gets enough wisdom
when the time comes for her
 to spread her wings and fly.

November 29, 2010

One thing that scares me in : NOVEMBER


When I thought of what to fill 
in this album's project,
suddenly
a thought came by
and I said to myself,
"How if I don't have much time left
to say everything I want to pass on
to my daughter?"
Some sayings cannot be said now
cause I think she will not understand anyway.
But 
when the time comes that she is ready,
will I be there beside her?

That was one scary thought.
But real.
So I have to deal with that.
I decided I will begin to put
many things and writings I want to
pass on to her someday,
 right now.

I will post the album shortly.

ARSTY GIRL - scrapper bag


While I am still recovering from the fatigue
and of course from that too many fun, laughter
and satisfying workshops at Artsy Girl 
last weekend,
I am trying to edit the photos of the event
as soon as my eyes permit, with help from 
mr.photographer a.k.a mas Dida,
meanwhile,
I will post this scrapper canvas bag
that we all altered at the workshop.

These photos were already taken and edited
before the event,
so all I have to do today is posting them.
(in case you wonder why I choose these pics
first to post instead of others...*sigh)

It always begin with a blank canvas.
Oh, such possibility.

 
Inside divider for storing papers

And we did all the collage until
it all covered like this


This is my step by step painting process.
Enjoy


I might do the other side of the bag later
with something different, beside painting,
we'll see.

I'll post the artsy album tomorrow.
Be back soon!

November 25, 2010

Artsy Girl workshops - last preparation


Two days to Artsy Girl Workshops.
I am preparing all the last details
for the event
together with my two buddies,
Alice and Suryanti.

Am exhausted yet thrilled.
The pic above is one of
the inspiring possibilities I will be 
offering at the workshop.


Time does wonderful things
Always


I'll be back here after the event.
See you soon!

November 20, 2010

Christmas Album 2010 - the foundation


What smells likes Christmas is in the air to you?
For me,
Christmas kicks in
the moment I saw this on Ali Edwards's web


Yes, her December daily is really good idea
to start the holiday and actually finished it
in the right time.
You can easily get dizzy or inspired
by looking others who follow her steps
to build the album's foundation, here.

Uh...uh,
and of course this is other thing
that kicks my Christmas' spirit
right on the spot.
r.i.g.h.t there.


And why oh why you wonder,
that we should build the foundation
for this Christmas album NOW?
Because it is faster and easier
when you do something in the right time
and in the right zone.
If you finished the basic album now,
later on January,
all you have to do is print those pics
and add to the album.
However,
if you begin to do the album on January,
it will be done about early Feb, and
trust me,
the spirit will change from
Christmas to Valentine or Imlek,
or whatever, IN A BLINK,
and the album will have the same destiny


which is still in that same condition.
Unfinished.
*sobbing in tears*

So,
this year I will do the job
nice and early,
which I felt in love with
the moment I saw it here.

And to made myself really 'in' to the zone,
I made it together with my scrap mates
during private classes,
who happen to had the same album kit.

Here are the details for the cover


And the inside album

I put pattern paper, folded and punched

The other punch is like this,
all are beautiful.

Thinking about 
inking this transparencies later.

 another folding,

And look at this thick felt
which came with the kit.
I just love it!
Really love this material.

and another transparencies,

Since I knew my own limit
during the crazy season and deadlines,
I will not drive myself nuts
by doing this as Daily Christmas Album,
so I will not put the number 1-25
as the daily date here.

But I will do my best
and add on more matting papers and 
tags for journaling, before the season
really start in about 10 days.
*horor face here*


Peace on earth.
Peace to you.

November 16, 2010

You rock! -12x12 layout-


I am so cannot remember
when was the last time I made 12x12 layout
only for myself.
*
sigh

And to tell you the truth
this one still IS NOT only for myself,
I made it couple days before, as sample
for a private class here in Bandung.
But still,
it's simple and I am back to 12x12.

Inspiration for it struck me
when I saw this layout on the mag,
by
Lucy Edson
I love her palette of color selection,
and all her pages looks simple,
yet striking.
 

It reminds me instantly to the theory
of color proportion for scrapbook
that I read zillion times in
Her writing still make me smile till today
and her theories are tried and true.

Then it reminds me that I haven't got the chance
to pass on this color proportion theory
to many beginner scrappers,
so I decided to make this layout.

The theory is go like this :
( I copy it directly from Cathy's book
since she described it perfectly)

How much of each color you use on your pages
can greatly or subtly alter their effect.
A great rule of thumb for creating layouts
with color balance
is the gallon/pint/ounce approach.

The dominant color is the gallon amount.
This color is frequently the main background
cardstock/paper in your layout.
The secondary color is the pint amount.
Use this to create journaling blocks,
or smaller areas of background.
The accent color, the ounce amount,
could be as simple as some embellishments,
or the mats you place around your photos.

That simple.
For my layout above,
The gallon color is pink.
The pint color is brown.
The ounce color is turquoise.
Make sense, right?
Each color have its different portion/job,
without clashing or competing with each other.

But wait,
the smart Lucy Edson's page
still have one more theory
which made her layout really really caught
my eyes the minute I opened the mag.
Yeees,
The magic number three's theory.
For this one, I opened again Cathy's book
and read this :

Repeating an element three times is optimum.
Odd numbers of elements have slightly
more energy than even numbers.
Think of the difference between
symmetrical(formal, stable), and
asymmetrical( informal, energized).
This also applies to the number of times
an element is repeated.
And if you put them in a visual triangle,
it will have more impact.
A visual triangle is when you place
three elements on a page,
and they form a triangular relationship
to one another.

Lucy made her red flowers as a visual triangle,
the same I did with my turquoise accents.
You can imagine
if the accents were put differently,
maybe in some linear or rectangle form,
the effect will not be so dramatic.

It's simple and doable, right?
Of course you don't need to apply it
to every pages,
but when someone asked me what will make
a layout stand out from the others,
I had always always gave them these theory
as part of the answer.

Some details from my layouts :

 
       Specific title about the subject
and simple journaling

 Texture.
Don't forget to add texture.

 Playing with gesso and gel medium
to give my layout personal touch
is a habit. A healthy habit.

 The date.
Or only month and year will be sufficient too.
When I put the date here,
I closed my eyes,
Gosh, where are those two years time flies?


Hope today's post will give you
something useful when you scrap next time.
See you soon!

November 11, 2010

You become what you believe


What you believe
has more power 
than what you dream or wish
or hope for.
You become what you believe.

Oprah Winfrey


For you owl lovers,
these wooden owls will steal your heart
and charm your projects for sure.
Check them out at my counter in Senci&Citos,
or IP in Bandung.

I believe in owl.

November 9, 2010

Glimmer Mist - on chipboard embellishments


You may remember these chipboard embellishments
as one type from many that I sold on fb
few weeks ago, or you may saw it at my store
at Citos or Senci, Jakarta or IP, Bandung.
(Hopefully you already grabbed some.:))

I just have the chance now
to show you how to color these chipboards, 
beside using acrylic paints that I used to
show you in my classes.
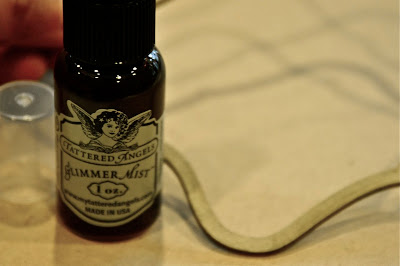
This method using Glimmer Mist from Tattered Angels
is much simpler and quicker for sure.

Are you ready?

First,
You can take one of frame chipboard here


And trace the shape to the patterned paper
you will use later, cut it a few mm smaller
than the chipboard shape.


Of course,
The photo size you choose must be fit nicely
into the frame chipboard.


Now, Bring it on, baby....
bring the glimmer mist on....


I like to use some cardstock as background
while I am spraying, cause the mist
will go everywhere...
and I intend to NOT waste any of it.LOL.
I'll use the cardstock later for, well,
anything.
So all you have to do is tap the bottle
slowly in the bottom, to your palm.
(not shaking the bottle, cause it will cause the
glimmer powder to go straight up and choke
the spray, which will make you to do extra work 
with washing the spray head with warm water
to clean it up again, or spray it with 'tornado'
-a gear to clean up camera lens-)

After the powder blended with water, spray it.


See the glimmering color there?
If at first you spray it you only see
the water, not the glimmer,
don't fred, just spray some more.
From the pic above, you may think that 
the color doesn't change much.
But see it when I put the frame back
to the other size of raw chipboard frames
I took from earlier.


Nice, right?
And with the less amount of drying time,
you can glue it to your page immediately
and finish your layout in no time.


After you trying these very basic skill
for using glimmer mist,
I'll add on more tips and skill using it
in my next class.


note : The photo of the dress is belong
to Mrs.Vina Vinessa who designed it.
I was asked to make her portfolio
with scrapbook style,
which I gladly make this last two weeks.

About me

  • I am a woman who fell in love with papers and words long enough before with boys. Therefore, scrapbooking, writing, reading, and art journaling are just things that complete me. I live happily in Bandung, Indonesia, with my husband, Audy Kusnadjaja, and 2 adorable kids adore me. Isn't life sweet?
My profile

About this home

Be careful while going inside my home here. Your clothes may gets stain if you happen to walk by my still wet canvas, or stumbled upon our piles of books everywhere, and come out with a scrap paper sticking to your shoes. But I promise you, you'll enjoy the time spending here. Tea or coffee?
  • The beginning
  • Last preparation
  • Artsy Girl's scrapper bag
  • Artsy Girl's mini album
  • Back to school
  • You rock!
  • Doilies for memories
  • Becoming an artist
  • Scrap my heart away
  • Too much of good things
  • Yellow sometimes
  • Double pages
  • Some layouts
  • Don't reinvent the wheel
  • Tips for dividing scrap time
  • Back to school album
  • Christmas album 2009
  • A month to play, a month to learn
  • 'Life happens' album
  • My girl's b'day album
  • Recycling the baby book
  • My boy's b'day album
  • About stranger
  • Make something every day
  • 2009 Art journals - bounded
  • Art journals - begin
  • 2009 Daily Journal
  • 2008 Daily Journal
  • Cracked
  • Parade
  • Hierarchy
  • Fleeting
  • Legendary
  • Time
  • Voices
  • Balloon
  • Wise
  • Repair
  • String
  • First painting
  • Life of two girls-treasure box
  • Box of memories
  • Making your own embellishment
  • A month to play and learn
  • Art journal album cover
  • Week in The Life - 2011
  • Week in The Life - 2010
  • Week in The Life - 2009
  • Week in The Life - 2008
  • To see the album - click here
  • To see the class - click here
  • To see the album - click here
  • To see the class - click here
  • To see the album - click here
  • To see the class - click here
  • To see the layouts - click here
  • To see the class - click here
  • To see the album - click here
  • To see the class-group 1 - click here
  • To see the class-group 2 - click here
  • To see the album - click here
  • To see the class - click here
  • To see the album - click here
  • To see the Jkt's class - click here
  • To see the Bdg's class - click here

  • The story - click here

  • The story - click here

  • See inside - click here

  • See inside - click here
  • See inside - click here
  • See inside - click here
  • See inside - click here
  • Other article - click here
  • My Artist Papers

  • Wings in The Cage - series
  • Where is it ? - click here
  • New place - click here
  • Eat&Eat Kelapa Gading
  • Eat&Eat - part 2
  • Kartika Sari-kebon jukut
  • Warung Talaga-PVJ
  • Sagoo restaurant Bogor
  • Eat&Eat 2 - Gandaria City
  • Goela Merah - foodcourt
  • Ba-koel - foodcourt
  • MariSini - food stall
  • Eat&Eat 3 - Surabaya
  • Warung Talaga Ciwalk - new place
  • Wajan restaurant
  • Warung Talaga - Serpong
  • Eat&Eat 4 - Serpong
  • Lekker Bekker